Here are the basics steps on formatting your manuscript in Microsoft Word for self publication. These steps include including setting up the correct trim size, setting up the correct margins, formatting the text, and numbering the pages.
- Be sure your book is in ONE electronic file.
- Set up your page size. The Directions below are for MS Word 7 and 10
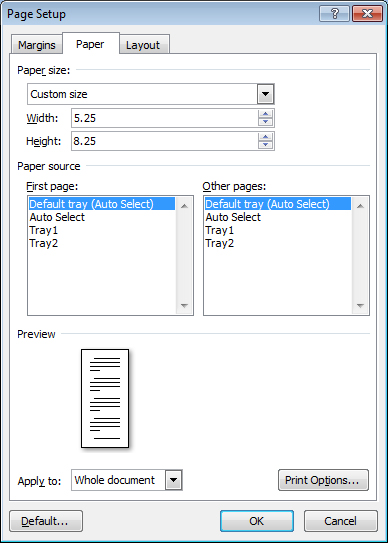
- The most common and most economical trim sizes is 5.25 inches wide x 8.25 inches tall. To format to our other sizes, please change the “PAPER SIZE” per the following instructions. All other adjustments stay the same.
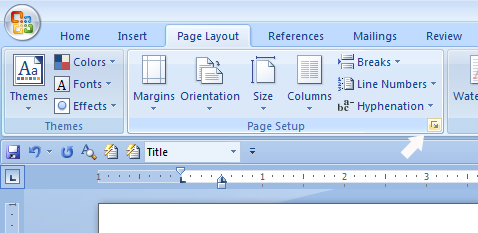
- In MICROSOFT WORD, open a NEW Document and click on PAGE SETUP under PAGE LAYOUT.
- Set your PAPER SIZE to Custom 5.25” x 8.25”.
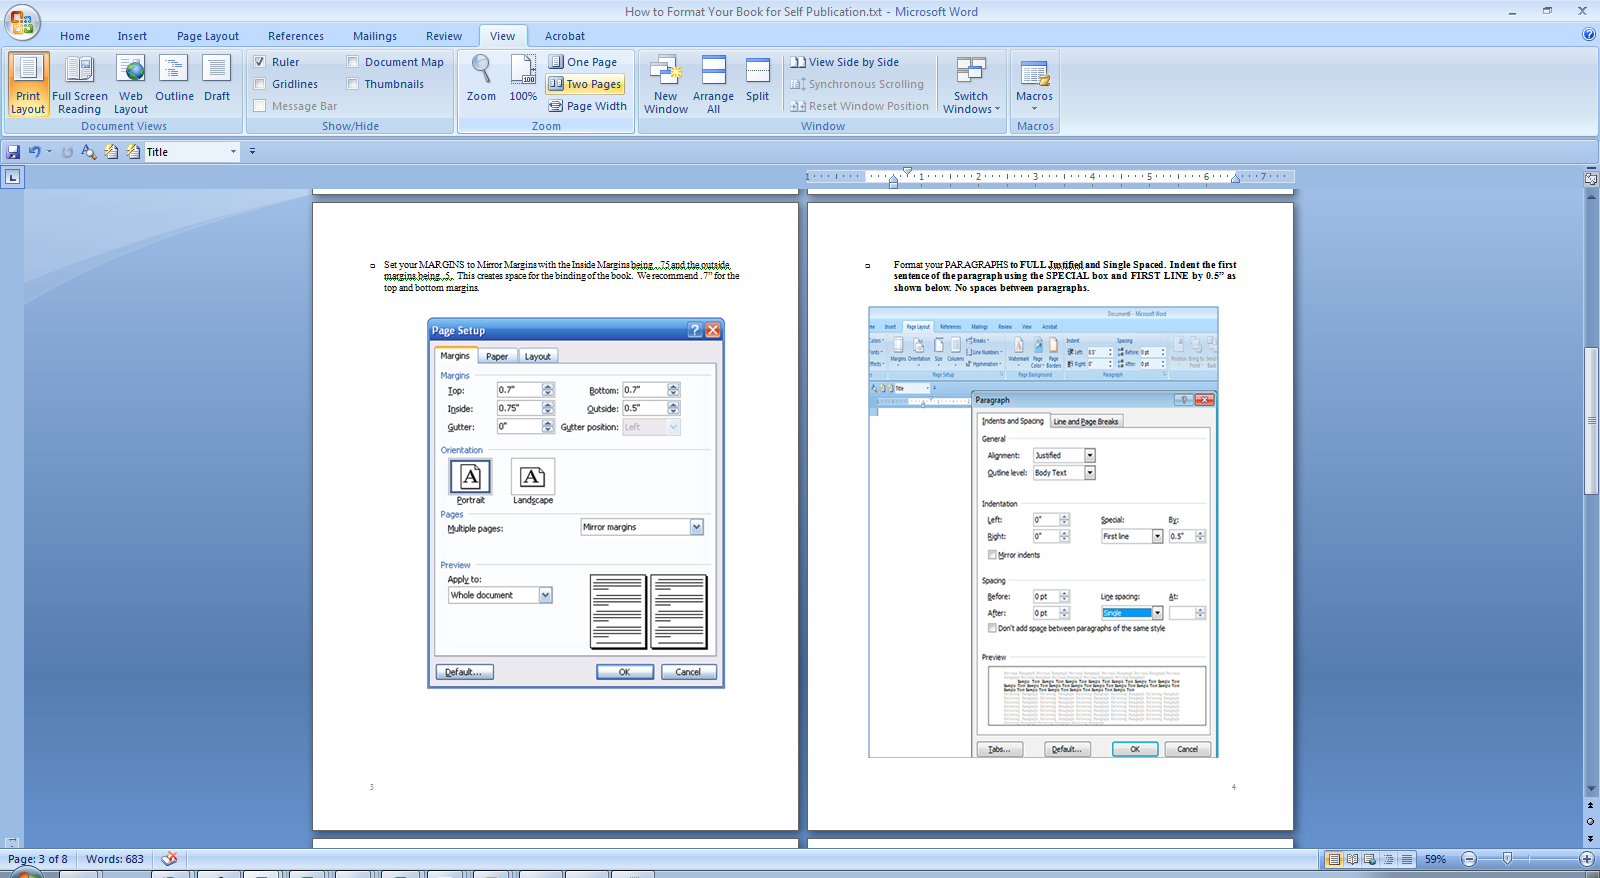
- Set your MARGINS to Mirror Margins with the Inside Margins being .75″ and the outside margins being .5″. This creates space for the binding of the book. We recommend .7” for the top and bottom margins.
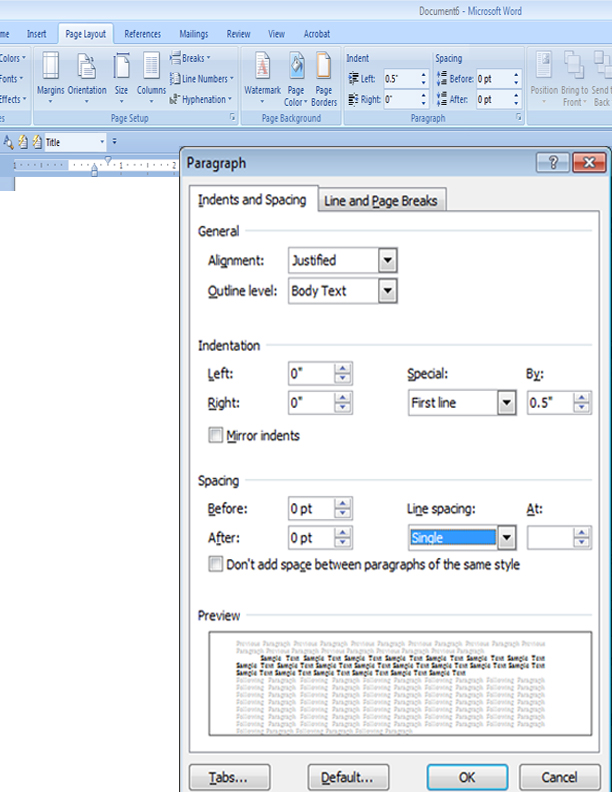
- Format your PARAGRAPHS to FULL Justified and Single Spaced. Indent the first sentence of the paragraph using the SPECIAL box and FIRST LINE by 0.5” as shown below. No spaces between paragraphs.
- You are now ready to put your book into this format. Close your existing book file. With the above described blank document open in Microsoft Word, go to the top Tool Bar; and the INSERT tab. Click OBJECT and then Text From File. Select your book and click INSERT. You have now put your book in the correct basic format.
- If your book is in separate files, for example each chapter in its own file, you must INSERT Chapter One, then place the cursor at the END of Chapter One and INSERT Chapter Two, and so on, into the main book file.
- Once the file has been inserted, view the page size on your as TWO PAGES. This will make the chapter location and the page numbering easier to visualize.
- Body Text should be set to 10 to 12 point Times New Roman text font. Actually, you may use any font you want; however, it is best to use an easy-to-read font. Also, keep the font and the font size consistent for a professional-looking book.
- Page Numbers should be positioned “Bottom of page (Footer)” On an even numbered page, the Page Number should be on the Outside Left. On an odd numbered page, the Page Number should be on the Outside Right.
- To begin page numbering you must first insert a SECTION BREAK on the last page prior to where you want page ONE to begin. In most cases page one is also the first page of Chapter One.
- You want page ONE and all other ODD-NUMBERED pages to be right-hand pages. Page ONE is always an ODD-NUMBERED and RIGHT-HAND page. When working in Microsoft Word, this can be a bit confusing. A right-hand FACING page may appear on the left side of your screen when you are viewing the document as TWO PAGES. This will become clearer if you put page numbers on the OUTSIDE. Page ONE will then have the page number on the right side of the page, making it a right-hand page. If page ONE is a left-hand page, simply insert a PAGE BREAK before the SECTION BREAK. Remember, you are creating a book, so think as though you had the book lying open in front of you on the table.
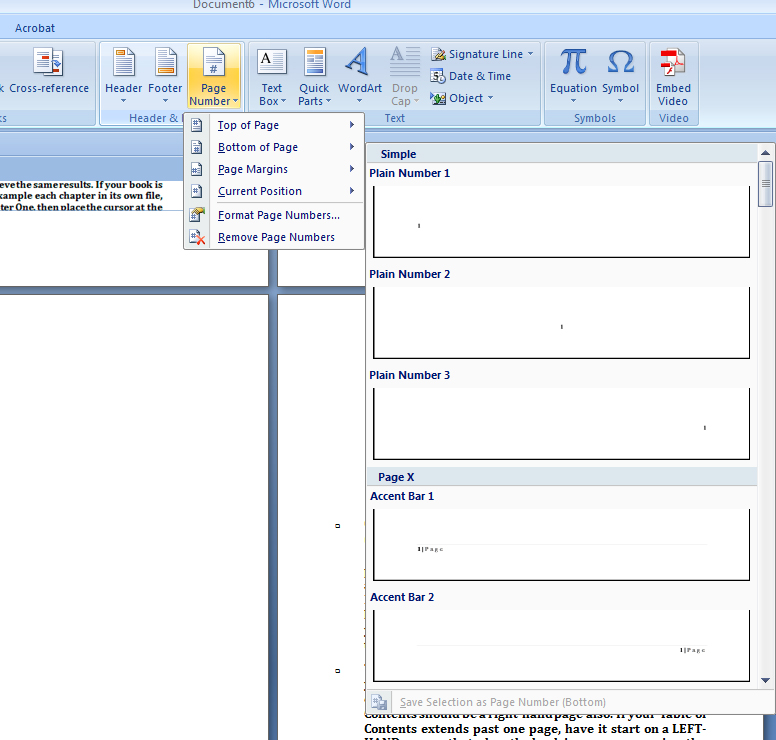
- Here is how to set the Page Numbers in MS Word 7 and 10:
- Go to Insert
- Go to PAGE NUMBER
- Go to Bottom of Page
- Choose a Left Hand Page Number for an Even Numbered Page (For example Plain Number 1)
- Choose a Right Hand Page Number for an Odd Numbered Page (For example Plain Number 3)
- Each chapter should begin on its own RIGHT-HAND page. This often requires adding a blank page at the end of a chapter in order to make the next chapter begin on a RIGHT-HAND page. If you choose not to adhere to the right-hand Chapter starts, however, that is acceptable to us.
For more information on formatting your manuscript for publication you can request a FREE copy of Professional Self Publishing Made Easy published by Bookstand Publishing. Registering will also give you access to our preformatted MS Word Templates that you can download to your computer. To register, please go to www.bookstandpublishing.com and fill out your name and email address on our home page.
Article Tags
Here are the basics steps on formatting your manuscript in Microsoft Word for self publication. These steps include including setting up the correct trim size, setting up the correct margins, formatting the text, and numbering the pages.
- Be sure your book is in ONE electronic file.
- Set up your page size. The Directions below are for MS Word 7 and 10
- The most common and most economical trim sizes is 5.25 inches wide x 8.25 inches tall. To format to our other sizes, please change the “PAPER SIZE” per the following instructions. All other adjustments stay the same.
- In MICROSOFT WORD, open a NEW Document and click on PAGE SETUP under PAGE LAYOUT.
- Set your PAPER SIZE to Custom 5.25” x 8.25”.
- Set your MARGINS to Mirror Margins with the Inside Margins being .75″ and the outside margins being .5″. This creates space for the binding of the book. We recommend .7” for the top and bottom margins.
- Format your PARAGRAPHS to FULL Justified and Single Spaced. Indent the first sentence of the paragraph using the SPECIAL box and FIRST LINE by 0.5” as shown below. No spaces between paragraphs.
- You are now ready to put your book into this format. Close your existing book file. With the above described blank document open in Microsoft Word, go to the top Tool Bar; and the INSERT tab. Click OBJECT and then Text From File. Select your book and click INSERT. You have now put your book in the correct basic format.
- If your book is in separate files, for example each chapter in its own file, you must INSERT Chapter One, then place the cursor at the END of Chapter One and INSERT Chapter Two, and so on, into the main book file.
- Once the file has been inserted, view the page size on your as TWO PAGES. This will make the chapter location and the page numbering easier to visualize.
- Body Text should be set to 10 to 12 point Times New Roman text font. Actually, you may use any font you want; however, it is best to use an easy-to-read font. Also, keep the font and the font size consistent for a professional-looking book.
- Page Numbers should be positioned “Bottom of page (Footer)” On an even numbered page, the Page Number should be on the Outside Left. On an odd numbered page, the Page Number should be on the Outside Right.
- To begin page numbering you must first insert a SECTION BREAK on the last page prior to where you want page ONE to begin. In most cases page one is also the first page of Chapter One.
- You want page ONE and all other ODD-NUMBERED pages to be right-hand pages. Page ONE is always an ODD-NUMBERED and RIGHT-HAND page. When working in Microsoft Word, this can be a bit confusing. A right-hand FACING page may appear on the left side of your screen when you are viewing the document as TWO PAGES. This will become clearer if you put page numbers on the OUTSIDE. Page ONE will then have the page number on the right side of the page, making it a right-hand page. If page ONE is a left-hand page, simply insert a PAGE BREAK before the SECTION BREAK. Remember, you are creating a book, so think as though you had the book lying open in front of you on the table.
- Here is how to set the Page Numbers in MS Word 7 and 10:
- Go to Insert
- Go to PAGE NUMBER
- Go to Bottom of Page
- Choose a Left Hand Page Number for an Even Numbered Page (For example Plain Number 1)
- Choose a Right Hand Page Number for an Odd Numbered Page (For example Plain Number 3)
- Each chapter should begin on its own RIGHT-HAND page. This often requires adding a blank page at the end of a chapter in order to make the next chapter begin on a RIGHT-HAND page. If you choose not to adhere to the right-hand Chapter starts, however, that is acceptable to us.
For more information on formatting your manuscript for publication you can request a FREE copy of Professional Self Publishing Made Easy published by Bookstand Publishing. Registering will also give you access to our preformatted MS Word Templates that you can download to your computer. To register, please go to www.bookstandpublishing.com and fill out your name and email address on our home page.


